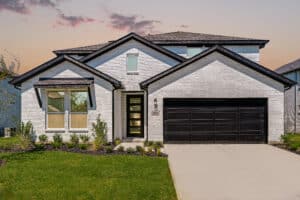
- Homes with drone photography sell 68% faster than those without.
- 97% of buyers start their search online, and high-quality drone photos grab attention.
- By 2024, 35% of realtors will use drones, helping homes sell 32% faster.
Key Camera Settings for Real Estate Drone Photography:
- Sensor Size: Larger sensors (1-inch or more) capture sharper images in low light.
- ISO: Stick to ISO 100–400 for sharp, noise-free photos.
- Shutter Speed: Use 1/500–1/1000 sec to avoid motion blur.
- Aperture: f/8–f/11 ensures sharpness across the frame.
- File Format: Shoot in RAW for better editing flexibility.
- White Balance: Adjust manually for consistent, accurate colors.
Quick Tips:
- Use grids for better composition (Rule of Thirds).
- Auto-flight modes like Tripod or Orbit stabilize shots for pro-level results.
- Follow FAA rules and MLS standards (e.g., 72 DPI resolution).
Mastering these settings ensures your drone photos stand out, attract buyers, and help properties sell faster.
10 MINUTE Drone Workflow for Real Estate PHOTO & VIDEO | BTS Flight & Best Settings!!
1. Sensor Size and Image Resolution
When diving into drone photography for real estate, two things stand out as game-changers: sensor size and image resolution. These elements are the backbone of capturing crisp, professional-grade property photos. Why? A larger sensor gathers more light, which means sharper images even in tricky lighting conditions.
Professional drones come equipped with sensors ranging from 1/2.3-inch to full-frame (24mm x 36mm). The bigger the sensor, the better it handles low-light situations and reduces image noise – both critical for capturing stunning exterior shots.
Here’s a quick comparison of common sensor types and their strengths:
| Sensor Type | Key Benefits | Best Use Case |
|---|---|---|
| Full-frame | Excellent low-light performance, true-to-life lens ratio, widest field of view | High-end real estate shoots, twilight photography |
| APS-C | Balanced image quality and size, moderate crop factor | Mid-range property shoots |
| 1-inch | Compact yet capable, handles low light decently | Standard aerial property shots |
| 1/2.3-inch | Lightweight and budget-friendly | Basic exterior overviews |
These comparisons provide a solid starting point for choosing the right drone to elevate your property photography.
When it comes to resolution, think about how the images will be used. For example, the Multiple Listing Service (MLS) typically requires 72 DPI for online listings. However, always shoot at your drone’s highest resolution. This ensures flexibility for post-editing and guarantees your photos look sharp, whether online or in print.
“Investing in high-quality drones with cameras guarantees that every detail of your scene is captured with precision, enhancing both photography and videography.” – SolDrones [1]
To make the most of your drone’s capabilities, keep these tips in mind:
- Maximize resolution: Always use the highest resolution setting available.
- Shoot in RAW: RAW format retains more image data, giving you more control during editing.
- Stick to standard aspect ratios: Use 3:2 or 4:3, which work best for real estate photography.
One thing to note: larger sensors often mean heavier drones and a higher price tag. But if you’re serious about professional real estate photography, investing in a drone with at least a 1-inch sensor is worth it. The added image quality can make all the difference when showcasing property details [2].
Understanding how sensor size and resolution affect your photos is essential before diving into other camera settings. These are the building blocks for capturing properties that truly stand out.

2. ISO Settings to Reduce Image Noise
Getting the right ISO settings is crucial for maintaining clarity and detail in aerial property photography. ISO determines your camera’s sensitivity to light – the lower the ISO, the cleaner and sharper your images will be.
For bright daylight scenarios (perfect for real estate photography), ISO 100 is your go-to setting. This is especially important when using professional drones like the DJI Mavic and Phantom series, which are optimized for ISO 100 to deliver the best image quality [3].
Here’s a quick guide for adjusting ISO based on lighting conditions:
| Lighting Condition | Recommended ISO | Additional Tips |
|---|---|---|
| Bright Sunlight | 100 | Use ND filters if necessary |
| Cloudy/Overcast | 200–400 | Keep an eye on noise levels |
| Golden Hour | 100–200 | Adjust as the light fades |
| Blue Hour | 200–400 | Can go up to 800–1,600 with noise reduction |
| Low Light | 400–800 | For very low light, consider high ISO stacking |
When shooting in bright conditions, avoid using Auto ISO. Instead, switch to manual mode and pair ISO 100 with ND filters to manage exposure effectively [3].
For low-light situations, like twilight or blue hour, high ISO stacking can help minimize noise while preserving detail:
- Use burst mode to take 3–5 consecutive shots.
- Set a faster shutter speed and shoot at ISO values between 800–1,600.
- Combine the images during post-processing to reduce noise [5].
Keep in mind: doubling the ISO doubles the brightness [7], but it also increases noise. For professional real estate photography, staying within the ISO 100–400 range during optimal lighting ensures sharp, detailed images.
For blue hour photography, start with ISO 200–400. Cameras with larger sensors can handle higher ISO levels more effectively, making them a great option for challenging lighting conditions [3].
Lastly, use your histogram as a guide to avoid overexposure while fine-tuning your ISO settings. This balance is key to producing high-quality real estate photos. Up next, we’ll explore how shutter speed settings can further enhance your aerial shots.
3. Shutter Speed Settings
Shutter speed is a key factor in capturing sharp, high-quality aerial real estate photos. When photographing from a drone, even the slightest movement can create unwanted blur, so choosing the right shutter speed is crucial.
For best results, aim for shutter speeds between 1/500th and 1/1000th of a second. A sweet spot of 1/750th of a second works well on a full-frame camera when using lenses up to 100mm in length[8]. If you’re dealing with windy conditions, go for 1/1000th of a second or faster to counteract the drone’s increased movement.
Using shutter priority mode can help. This mode lets you lock in your desired shutter speed while the camera adjusts other settings automatically[8]. As a general rule, keep your shutter speed at a minimum of 1/200th of a second for real estate drone photography[9].
When conditions get tricky, try these tips:
- Take sample shots at your shooting altitude to find the ideal shutter speed[10].
- Wait for calmer wind conditions if you need to use slower speeds[11].
- Use spot metering on mid-toned areas to ensure balanced exposure in high-contrast scenes[13].
Dan Molenhouse, a Solutions Engineer, highlights the importance of balancing exposure settings:
“The exposure triangle combines all three elements of exposure and shows the relationship between ISO, shutter speed, and aperture. Altering one of the elements will cause the other two to also shift to ensure the image remains properly exposed.” [14]
Start by adjusting your shutter speed, then fine-tune the aperture. Use ISO as a final adjustment to achieve the perfect exposure[12]. Up next, let’s dive into how aperture settings can further enhance your aerial photography.
4. Aperture for Property Photos
Aperture plays a key role in controlling both the amount of light entering the camera and the depth of field in your shots. For real estate drone photography, sticking to an aperture range of f/8 to f/11 is often your best bet. This range ensures sharpness across the frame while maintaining a good balance between depth of field and overall image clarity [6].
Here’s how you can tweak your aperture settings depending on the lighting conditions:
- Bright sunlight: Start with f/11 at ISO 100 for a well-exposed, sharp image. If you want a darker, moodier tone, adjust to f/13 or f/14. Need more light? Open up slightly to f/10 or f/9.
- Evening shots: Begin with f/8 at ISO 200. If the light dims further, widen the aperture to f/7.1 or even f/6.3, and increase your ISO to 400 or 800 as needed.
Be cautious about pushing the aperture too far. At very high f-stop numbers, diffraction can start to soften your images [15]. While settings like f/5.6 or f/16 can work in specific scenarios, they’re generally at the edges of what’s ideal for capturing real estate photos [6].
Once your aperture is dialed in, the next step is selecting the right file format to preserve all that detail during post-processing.
5. RAW or JPEG File Format
After dialing in camera settings like ISO and aperture, the next big decision in drone real estate photography is choosing between RAW and JPEG file formats. This choice can have a major influence on both the quality of your images and your editing capabilities. Let’s break down the differences so you can decide which works best for your needs.
RAW files store unprocessed sensor data, capturing 12–14 bits of brightness information. This means they can record between 4,000 and 18,000 levels of brightness, compared to JPEG’s much smaller 8-bit depth, which handles only 256 levels [19]. In practical terms, RAW files give you far more flexibility when editing.
| Feature | RAW | JPEG |
|---|---|---|
| File Size | 2–6× larger than JPEG [18] | Smaller, compressed |
| Dynamic Range | Higher (12–14 bit) | Lower (8-bit) |
| Editing Flexibility | Extensive | Limited |
| Processing Required | Yes | No (ready to use) |
| Storage Needs | More space needed | Less space needed |
For aerial real estate photography, RAW format has some clear advantages:
“With RAW you have additional information in the file, so it’s much easier to correct the image without a drastic reduction in quality. You can also recover more blown highlights and clipped shadows.”
- Randy Braun, Co-founder of the DJI Aerial Photo Academy [21]
One smart approach is to use the RAW+JPEG setting on your drone camera [20]. This way, you get the best of both worlds: quick JPEG previews for immediate use and RAW files for detailed editing.
That said, JPEG can be a practical choice if you’re working on tight deadlines or need to share images quickly. But for professional real estate photography – where quality is non-negotiable – RAW format is the better option. It gives you the control to fine-tune exposure, white balance, and colors during post-processing [17].
Keep in mind, RAW files do require specialized editing software and more time to process. However, the ability to recover details in shadows and highlights and make non-destructive adjustments makes the extra effort worthwhile [34, 37]. Up next, we’ll dive into white balance settings to further elevate your aerial photography.

6. White Balance Settings
White balance plays a crucial role in achieving accurate, lifelike colors in your drone photography. The color of natural light changes throughout the day – ranging from the warm, golden tones of sunrise (3,000–4,000K) to the cooler shades found under overcast skies (6,500–8,000K) [22]. While Automatic White Balance (AWB) might seem convenient, it often struggles with consistency, especially when lighting conditions shift or during video recordings. This is why manual adjustments are key for precise and reliable results.
Here’s a quick reference for outdoor lighting and their corresponding white balance settings:
| Time of Day/Condition | Color Temperature (K) | Recommended Setting |
|---|---|---|
| Sunrise/Sunset | 3,000–4,000K | Set manually to 3,500K |
| Clear Midday Sun | 5,000–6,500K | Daylight Preset |
| Moderately Overcast | 6,500–8,000K | Set manually to 7,000K |
| Heavy Overcast | 9,000–10,000K | Set manually to 9,500K |
“White balance is a key component in all photography, and is essential when capturing accurate recreations of a scene and keeping it as realistic as possible. It is one of those things that, when correct, goes unnoticed, but when incorrect, is quite obvious and can ruin a photo or video.” – dronegenuity
To ensure your shots look consistent and professional, follow these tips:
- Set white balance manually in Kelvin (K) mode. Use an 18% gray card for calibration before starting your flight.
- Stick to the same white balance settings throughout video shoots to avoid any noticeable color shifts.
- Shoot in RAW to give yourself more flexibility for color adjustments during post-processing.
If you’re using a DJI Mavic Air, manual white balance adjustments are made simple with a dedicated slider in the camera settings. This feature lets you fine-tune the Kelvin value to match the lighting conditions, ensuring your photos and videos capture natural, visually pleasing colors that represent the scene accurately.
Up next, learn how grid lines can help you elevate your photo composition.
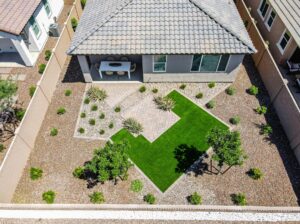
7. Grid Lines for Photo Composition
Using grid lines is a simple yet effective way to enhance the composition of real estate drone photos. Most drone cameras allow you to enable grid overlays through the settings menu, typically found near the shutter button [23].
The Rule of Thirds grid divides the frame into nine equal rectangles, creating four key intersection points. These points and lines help you position elements in a way that feels balanced and visually appealing. Here’s how to make the most of grid lines:
| Composition Element | Grid Line Placement | Purpose |
|---|---|---|
| Main Building | Intersection Points | Adds visual interest and balanced framing |
| Property Boundaries | Vertical Lines | Keeps alignment straight and perspective accurate |
| Horizon Line | Upper or Lower Third | Highlights either the sky or landscape |
| Landscaping Features | Horizontal Lines | Ensures symmetry and smooth visual flow |
When framing your shot, try to position key architectural elements along these grid lines or at their intersections. For larger properties, aligning the main building with a vertical grid line – rather than centering it – can create a more dynamic image that naturally guides the viewer’s eye.
Here are a few practical tips to get better results:
- Keep the horizon level by using horizontal grid lines.
- Align vertical structures, like walls or fences, with vertical grid lines.
- Place standout features – like swimming pools or driveways – at intersection points.
- Use the Rule of Thirds to balance landscaping elements for a harmonious composition.
While the standard 3×3 grid is a go-to option, some photographers prefer a 4×4 grid for detailed architectural shots. The extra lines provide more reference points, making it easier to achieve precise alignment.
Mastering grid-based composition not only improves your photos but also sets the stage for adjusting flight paths and camera settings to capture the perfect aerial view.
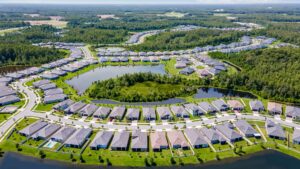
8. Auto-Flight Mode Settings
While precise camera settings lay the groundwork for high-quality images, automated flight modes take control and stability to the next level. These tools are invaluable for real estate photography, making it easier to capture professional-grade images with consistency.
Here’s a quick look at some of the most effective auto-flight modes for real estate photography:
| Flight Mode | Best Use Case | Key Benefits |
|---|---|---|
| Tripod Mode | Indoor shots & tight spaces | Slower speed and greater precision |
| Cinematic Mode | Exterior reveal shots | Smooth motion with gradual braking |
| Course Lock | Property perimeter shots | Steady controls, regardless of drone direction |
Tripod Mode slows down the drone and enhances control, making it perfect for capturing stable interior footage or navigating tight spaces [24]. Cinematic Mode creates smooth, fluid movements for those dramatic exterior reveals, but remember to allow extra room for its longer braking distance [24]. For exterior shots of property boundaries, Course Lock shines by keeping controls consistent, no matter which way the drone is facing [24].
To get the most out of these automated features, follow these tips:
- Maintain a steady altitude: Smooth and deliberate controls ensure stable, uniform shots.
- Handle wind with care: Use the drone’s automated stability features to keep your framing steady, even on breezy days [25].
These auto-flight modes blend seamlessly with manual settings, helping you achieve polished, professional results every time.
Common Flight Patterns for Real Estate Photography
Certain flight patterns work especially well in real estate photography:
- Orbit: Fly in a circular motion around the property, keeping it centered in the frame.
- Tracking: Follow property lines or specific features to provide consistent coverage.
- Reveal: Start with a close-up of the building, then pull back and ascend to showcase the entire property [26].
For example, Derrick Ward, a professional drone photographer in Utah, built a thriving real estate photography business by mastering these techniques. His expertise now allows him to charge $250 per hour for his services [27].
9. Color Settings for Editing
Once your drone is set up for the best image capture, tweaking its color settings can make post-processing much smoother.
Color Profile Selection
Choosing a flat color profile, like D-LOG, gives you more control when editing. This type of profile retains greater detail in both shadows and highlights, making it easier to adjust later [28]. If you’re using a DJI drone, opt for “D-LOG”, while other brands offer comparable “neutral” or “log” profiles [28].
“Besides exposing your image correctly, you want to shoot with a ‘flat’ color profile. This produces an image with the smallest amount of in-camera ‘color’ as possible, meaning it gives you more latitude to work with the image in post.” – Alan Perlman, UAV Coach [28]
Color Settings
Fine-tuning your settings is key to capturing footage that’s ready for professional editing. Here’s a quick guide:
| Setting | Configuration | Purpose |
|---|---|---|
| Color Profile | D-LOG or D-Cinelike | Provides flexibility for editing |
| ISO | Lower settings | Minimizes noise in flat profile footage |
| White Balance | Manual or preset | Ensures accurate color foundations |
| Vibrance | Moderate adjustment | Adds natural color depth |
When paired with proper shutter speed and white balance adjustments, these settings help you achieve polished, high-quality drone photography for real estate.
Post-Processing Workflow
During editing, start by adjusting the white balance. Use the eyedropper tool on a neutral gray or white part of the image for accurate color correction [29]. To maintain a professional look:
- Work on a calibrated display for accurate colors.
- Compare shots to ensure consistency across your footage.
- Save custom color presets to streamline your workflow.
- Prioritize vibrance adjustments over saturation for a more natural appearance [29].
Although flat profiles may initially seem dull, they offer unmatched flexibility for fine-tuning contrast and color during editing. With these techniques, you can ensure your images reflect the true essence of the property while maintaining a polished, professional finish [29].
10. FAA and MLS Requirements

Getting the best shots for MLS while staying within FAA rules requires careful planning and proper settings. Here’s how to align your camera setup and operations for a smooth, compliant aerial shoot.
Recommended Camera Settings for MLS Standards
The table below highlights key camera settings to meet MLS requirements and ensure top-quality photos:
| Setting | Value | Purpose |
|---|---|---|
| ISO | 100–400 | Keeps noise to a minimum |
| Shutter Speed | 1/500 sec or faster | Reduces motion blur |
| Aperture | f/4.0–f/5.6 | Balances depth of field and clarity |
| Format | RAW + JPEG | Provides editing flexibility |
| Focus Mode | Single-point AF | Ensures sharp property details |
FAA Guidelines for Safe Operations
When flying under FAA Part 107 regulations, especially below the 400-foot altitude limit, safety and clarity are key. Here are some operational tips to keep in mind:
- Use faster shutter speeds to minimize motion blur, especially in windy conditions.
- Ensure proper exposure to clearly capture obstacles and surroundings.
These steps not only improve photo quality but also help maintain compliance with FAA safety standards.
Combining FAA and MLS Requirements
To capture MLS-ready images while adhering to FAA rules, follow these tips:
- Set your white balance to the daylight preset for accurate colors.
- Keep your ISO between 100 and 400 to minimize grain.
- Use a shutter speed fast enough to prevent motion blur.
- Maintain an aperture of at least f/4.0 for balanced sharpness.
- Enable automatic exposure bracketing (AEB) to capture a range of exposures.
- Adjust the focal length as needed to frame the property effectively.
Conclusion
Getting the hang of drone camera settings is a game-changer for capturing stunning real estate photos. The right setup can make all the difference in showcasing properties effectively. Here’s a quick rundown of what works best:
Key Camera Settings
- Always shoot in RAW format to give yourself more flexibility during editing.
- Stick to a low ISO (100-400) in bright conditions to avoid noise.
- Use fast shutter speeds to keep your images crisp and clear.
- Opt for a moderate aperture to achieve a balanced depth of field.
- Turn on grid lines and the histogram to ensure proper composition and exposure.
- Take advantage of natural lighting, especially during the golden hours for the best results.
Why It Matters
- Listings with aerial visuals attract 65% more in-person showings [16].
- A whopping 83% of sellers prefer agents who use drone photography [16].
- 57% of buyers now expect to see 8-10 aerial shots in a property listing [16].
“The settings of the drone camera are the key factors that determine the shooting effect. By properly adjusting parameters such as resolution, frame rate, ISO, shutter speed, etc., you can capture amazing aerial beauty.”
- Autelpilot [4]
Mastering these settings doesn’t just elevate your photography – it also boosts your ability to impress clients and meet market expectations.
FAQs
Why is a larger sensor important for real estate drone photography?
When it comes to real estate photography, a drone camera with a larger sensor brings some serious perks. First off, it captures more light, which means better performance in low-light settings and less noise. The result? Crisp, clear images, even when lighting conditions aren’t ideal. Plus, larger sensors offer a wider dynamic range, so you can capture details in both the brightest highlights and the darkest shadows. This is a game-changer for shots of properties with tricky lighting, like outdoor views or interiors with big windows.
On top of that, larger sensors usually mean higher resolution. This allows you to showcase the finer details of a property, making listings more visually striking. And let’s face it – great photos can make a property stand out and draw in more potential buyers.
Why is shooting in RAW format better than JPEG for real estate drone photography?
Shooting in RAW format is a game-changer for real estate drone photography. Why? Because RAW files capture all the data from your camera sensor without compression, giving you access to more detail and a wider dynamic range than JPEGs. This means you can make precise edits – like recovering blown-out highlights, brightening up shadows, tweaking the white balance, or refining colors – without sacrificing image quality.
On the other hand, JPEG files are compressed, which strips away some of that valuable data. This limits your ability to make in-depth adjustments. In real estate photography, where crisp, accurate visuals are key to showcasing properties, RAW format gives you the tools to create polished, professional images that highlight every detail of a home or property.
Why should you manually adjust white balance for real estate drone photography, and how does it improve your photos?
Manually setting the white balance in drone photography is key to capturing colors that look natural and accurate. Lighting conditions – whether it’s the bright glow of sunlight or the muted tones of an overcast sky – can affect color temperatures, sometimes leading to unwanted tints like overly warm or cool hues. Adjusting the white balance yourself ensures the colors in your photos stay true-to-life, making the property stand out as it should.
Relying on automatic white balance can be tricky, especially when lighting changes, like transitioning from shade to direct sunlight. Manual control allows you to maintain consistency, delivering polished, professional images that showcase the property’s most appealing features.