Professional photos can help sell properties faster, for more money, and attract more buyers online. Listings with 20+ high-quality photos sell 32 days faster, earn up to $11,000 more, and get 118% more views. Here are the 10 essential shots every real estate listing needs:
- Front View: Showcase curb appeal with the best angle, lighting, and standout features.
- Main Entrance/Foyer: Create a welcoming first impression with clean, balanced shots.
- Living Room: Highlight space, layout, and natural light with wide-angle views.
- Kitchen: Focus on features like cabinets, appliances, and countertops with clean staging.
- Primary Bedroom: Capture size, comfort, and natural light with minimal clutter.
- Primary Bathroom: Use smart angles and lighting to balance reflections and details.
- Secondary Bedrooms: Showcase flexibility and functionality with consistent lighting.
- Backyard/Patio: Emphasize outdoor living areas and landscaping with flattering light.
- Special Features: Highlight unique elements like home offices, gyms, or wine cellars.
- Location/Neighborhood: Include window views, local amenities, and seasonal charm.
Quick Benefits of Professional Real Estate Photos:
- 300% more clicks with HDR photos.
- 4x more inquiries with walkthrough videos.
- Higher perceived value and faster sales.
These 10 shots ensure your property stands out, attracts buyers, and maximizes its market potential.
10 Real Estate Photography Tips You Need to Know 📸
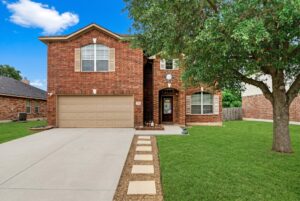
1. Front View and Street Appeal
The front exterior photo is the first thing potential buyers see, so it’s crucial to present the property in its best light.
Here’s how to nail the perfect front shot by focusing on the angle, timing, and key features.
Choosing the Best Angle
Stand at one of the front corners of the property, ideally opposite the driveway. This perspective captures more of the landscaping and architectural details while downplaying less attractive elements like garage doors. Keep your camera level to avoid distortion. If the house doesn’t fit in the frame, step back or switch to a wide-angle lens. Using a tripod ensures steady, professional-quality shots.
Timing and Lighting Matter
When it comes to outdoor photos, timing can make or break the shot. The "golden hour" – shortly after sunrise or just before sunset – offers the most flattering light. During this time:
- Soft, warm light enhances details.
- Shadows are longer and gentler.
- Colors appear deeper and more vibrant.
Showcasing Key Features
Make sure your composition highlights the property’s standout qualities:
- Framing: Zoom in enough to make the house look impressive while keeping some sky and treetops in the frame.
- Foreground Details: Include well-maintained landscaping and inviting walkways.
- Clean-Up: Remove any distractions like cars, garbage bins, or personal items.
- Curb Appeal: Mow the lawn and, if possible, add a few neutral-colored flowers for a polished look.
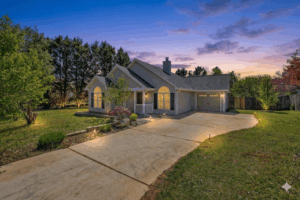
For twilight shots, turn on both interior and exterior lights to create a cozy, inviting glow. If the weather doesn’t cooperate, virtual dusk photography can be a great alternative.
Next, we’ll explore how to capture the interiors to keep potential buyers intrigued.
2. Main Entrance and Foyer
Once you’ve nailed the perfect exterior photo, the main entrance and foyer become the next critical focus. These images create the first indoor impression and set the tone for the rest of the home tour. Both composition and lighting play a key role here.
When to Highlight the Entryway
Showcase the entryway when standout features like front doors or French doors are present. These elements can add character and charm to your photos.
How to Capture the Perfect Shot
Position your camera for a one-point perspective, keeping the door slightly open to guide the viewer’s eye inside. For French doors, leave them fully open to emphasize their design and create a sense of openness. These small adjustments help transition viewers smoothly into the home’s interior.
Lighting Tips
Using HDR (High Dynamic Range) photography works wonders for foyer shots. This technique combines multiple exposures to ensure vibrant colors, crisp window details, and balanced lighting throughout the image.
Composition Advice
Frame the door in a way that naturally draws attention inward, while also highlighting its clean, welcoming appearance. Cindy Miller, Military spouse and Help-U-Sell Grein Group agent, shares her insight:
"Load photographs logically as you would enter the home: outside shot of the house, entryway, foyer, living room, kitchen, and so on."
Following this flow not only makes the home feel more inviting but also helps potential buyers visualize themselves moving through the space.
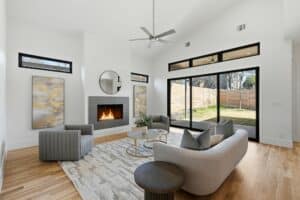
3. Living Room Layout
Show off the living room’s charm by carefully positioning your camera and using lighting that highlights its natural features.
Camera Height and Positioning
Set your camera at a height of 4 to 5 feet – around chest level – for a natural and balanced perspective. As Rob Moroto, Architecture Photographer at Calgary Photos, puts it:
"Shoot from the heart"
This height provides a realistic view of the space.
Highlighting Space and Flow
To emphasize the room’s size and layout:
- Use a wide-angle lens, but keep enough distance to avoid distortion.
- Shoot from corners to capture more of the room.
- Keep doorways open to show how rooms connect.
- Remove any items in the foreground that block the view.
- Arrange furniture at slight angles to create a sense of depth and openness.
Pair these techniques with thoughtful lighting to create a bright and inviting atmosphere.
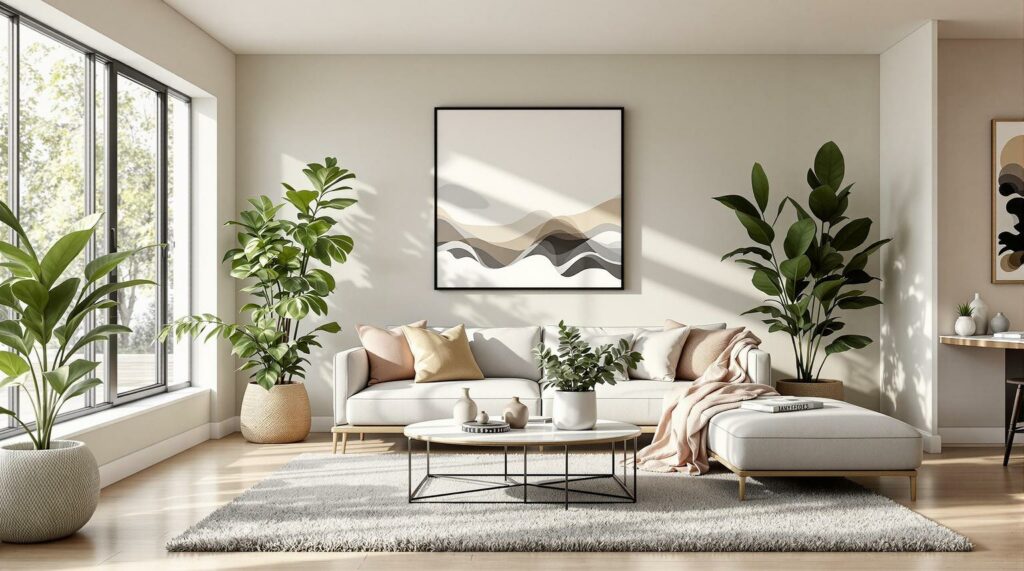
Making the Most of Natural Light
The right timing and light make all the difference in showcasing the living room:
- Open all windows to flood the room with natural light.
- Use a tripod to handle slower shutter speeds for sharper images.
As Tuttle explains:
"My main goal in capturing every space is to get it as close to reality as possible, with the ultimate goal of capturing not just how the space looks, but how it feels."
Fine-Tuning with Post-Processing
When editing your photos, focus on:
- Fixing vertical line distortion for clean, straight lines.
- Using HDR techniques to balance light and shadows.
- Keeping window details sharp and clear.
- Ensuring colors are true to life.
These polished living room images set the tone for photographing other key interior spaces.
4. Kitchen Features
The kitchen is often a standout feature for potential buyers, making it crucial to photograph it in the best possible way. This involves careful attention to timing, lighting, and composition.
Best Time and Lighting Tips
Shoot kitchen photos on sunny days between 10 a.m. and 3 p.m. Keep window treatments open and use warm white bulbs (at least 3000K) to create a welcoming, functional look.
"The kitchen is often referred to as the heart of the home because it is where the entire family gathers, meals are prepared, and memories are created."
Camera Settings for Kitchen Shots
Set your camera to ISO 100–200, use an aperture of f/8–f/11, and opt for a wide-angle lens (16–35mm). A tripod is essential for stability, and exposure bracketing can help you capture a range of light levels.
Preparing and Staging the Kitchen
Make appliances shine, clear out clutter, and add one or two decorative touches like a bowl of fresh fruit or a cookbook. Wipe down all surfaces to ensure a clean look. Once the kitchen is ready, focus on framing shots that highlight its standout features.
Composition Tips
Compose your shots to emphasize the layout and key elements:
- Wide Angle Overview: Take a photo from a corner to capture the flow of the space.
- Feature Highlights: Showcase details like custom cabinetry, premium appliances, backsplashes, or farmhouse sinks.
- Storage Solutions: Highlight practical features such as pantry organization, cabinet layouts, island storage, or built-in organizers.
Use leading lines from countertops or cabinets to guide the viewer’s eyes through the room. Placing key features along rule-of-thirds intersections can create a balanced, visually appealing composition.
Post-Processing Tips
Enhance your kitchen photos by:
- Balancing exposure to handle bright windows and darker areas
- Correcting colors to ensure cabinets and countertops look accurate
- Removing any distracting reflections or glare from surfaces
5. Primary Bedroom
A well-photographed primary bedroom can greatly enhance a property’s overall appeal. According to a study, 36% of buyers see staging the primary bedroom as highly important. Keep the space uncluttered and limit furniture to create a welcoming atmosphere.
"The primary bedroom plays a pivotal role in home staging because it’s often considered the emotional centerpiece of the home." – HomeLight
Key Photography Tips
Bed Setup
Make the bed the star of the room. Use clean, neutral-colored linens, align everything neatly, and add a single decorative pillow for a simple yet polished look.
Lighting
Take photos during the golden hour for soft, flattering light. Open curtains and blinds to let in natural light, and use warm bedside lamps for a cozy feel. Adjust your angles to showcase the room’s layout and storage features.
Framing the Shot
When composing your photos, focus on:
- The room’s size and layout
- Natural light sources
- Features like walk-in closets or built-in shelves
- Architectural elements
- Scenic views from windows
"Thoroughly clean the space to declutter and eliminate potential buyer distractions. Cleaning not only removes clutter but also prevents buyers from fixating on minor, insignificant details." – VirtualStaging.com
Staging and Storage Tips
Keep nightstands simple with a stylish lamp and one decorative item. For storage areas like closets, ensure they’re brightly lit, neatly arranged, and photographed from angles that highlight their size and organization. This helps buyers imagine themselves in the space while emphasizing the room’s standout features.
sbb-itb-82c5f45
6. Primary Bathroom
Photographing a primary bathroom can be tricky due to its compact size and reflective surfaces. The key is smart lighting and thoughtful camera placement.
Camera Positioning Tips
Set your camera just outside the doorway, slightly above waist height. This angle captures both the floor and ceiling, giving a full view of the room’s layout and essential fixtures.
Dealing with Reflective Surfaces
Bathrooms often feature mirrors, glass, and other shiny surfaces that can cause glare. Photographer Alex Huff from BorrowLenses shares a helpful tip:
"Pretend that lighting the space directly is simply not allowed. This will help you speed up your problem solving. Bouncing light off ceilings, walls, and white reflectors produces softer light and once you start doing it you will be hooked."
Here’s how to handle reflections:
- Bounce light off ceilings, walls, or white reflectors to create softer, even lighting.
- Shift your camera angle to avoid catching unwanted reflections in mirrors or glass.
- Use a polarizing filter to minimize glare on shower doors or other reflective surfaces.
Layered Lighting Setup
To make the bathroom feel warm and inviting, mix different lighting types. Experts recommend focusing on these three:
| Lighting Type | Purpose | Suggested Fixtures |
|---|---|---|
| Ambient | General room lighting | Flush or semi-flush ceiling lights |
| Vanity | Task-focused lighting | Wall-mounted sconces or pendant lights |
| Accent | Highlighting special features | Spotlights near the tub or shower |
This combination ensures balanced, flattering light throughout the space.
Showcasing Key Features
Draw attention to standout elements like thermostatic shower controls, LED faucets, or detailed tile designs. These details can elevate the bathroom’s appeal and functionality.
7. Secondary Bedrooms
Secondary bedrooms come with their own set of challenges. They need to look inviting, functional, and flexible while meeting professional expectations. Just like other spaces, these rooms rely on thoughtful staging, proper lighting, and attention to detail to capture buyer interest.
Staging Tips That Work
Start by clearing out personal items, such as toys or family photos. Use clean, neutral bedding and make the beds with care to create a polished, welcoming look.
Lighting Done Right
Good lighting can make secondary bedrooms feel larger and more inviting. Here’s a quick guide:
| Lighting Type | Purpose | Best Practice |
|---|---|---|
| Natural Light | Main illumination | Open blinds or curtains fully |
| Ambient Lighting | Soften shadows | Match bulb color temperatures |
| Accent Lighting | Add warmth and focus | Use table lamps strategically |
Amber Darby highlights the importance of expertise in capturing interiors:
"They have a keen eye for how to get the best shots of each room in a home."
Why HDR Photography Matters
HDR photography is a game-changer for secondary bedrooms. It balances bright windows and darker areas, making the room look its best. Listings with premium HDR photos see a 300% boost in click-through rates.
Consistency Is Key
Keeping bedroom photos consistent builds trust with potential buyers. Focus on these areas:
- Use the same camera height for all shots
- Stick to similar composition angles
- Apply uniform editing styles
- Ensure lighting is evenly balanced across photos
As one expert puts it:
"Consistency in photography is key to building trust and credibility with potential buyers."
Highlighting Flexibility
Secondary bedrooms can serve multiple purposes. Showcase them as guest rooms, offices, or nurseries to appeal to a broader audience. Use wide-angle shots to emphasize the room’s size, and include subtle details to suggest possible uses without cluttering the space. This approach helps buyers imagine the room’s potential in their own lives.
8. Backyard and Patio Spaces
Outdoor photos are just as important as interior shots when it comes to showcasing a property. Highlighting these areas effectively requires careful attention to timing, angles, and lighting to bring out their best features.
Choosing the Right Angles
For larger backyard spaces, capturing the area from multiple perspectives can help potential buyers get a complete sense of the layout:
| Shooting Position | Purpose | Tips for Best Results |
|---|---|---|
| Deck/Patio View | Shows how the yard connects to the home | Use a two-point perspective for a clean look |
| Corner of Yard | Provides a broad view of the entire space | Pay attention to the sun’s position for balanced lighting |
| Back of Yard | Highlights the relationship between the house and the yard | Include wide shots for context and tighter shots for detail |
Timing and Lighting
Lighting can make or break outdoor photos. The best time to shoot depends on the mood you want to create:
- Morning: Soft, diffused light provides even illumination.
- Midday: Use open shade to avoid harsh shadows, and check your histogram to prevent overexposure.
- Golden Hour: The warm, soft light during this time makes outdoor spaces look especially inviting.
These lighting strategies help emphasize the natural beauty of the space.
Showcasing Key Features
Help buyers imagine how they could use the space by focusing on its standout features. Pay attention to:
- Entertainment areas: Arrange furniture to suggest gathering spots.
- Landscaping: Highlight mature trees, gardens, or water features.
- Outdoor living elements: Showcase built-in grills, fire pits, and pool areas.
These details give buyers a sense of how the space can enhance their lifestyle.
Composition Tips for Stunning Shots
To create visually appealing photos:
- Use leading lines to draw the viewer’s eye through the space.
- Follow the rule of thirds for balanced and professional compositions.
- Include vignette shots with patio furniture to provide a sense of scale.
- Capture both wide-angle views and close-ups for variety.
With these techniques, your outdoor photos will stand out and leave a lasting impression.
9. Special Home Features
Once you’ve covered the main interior spaces, it’s time to showcase what makes a property stand out. Highlighting these unique aspects can grab buyers’ attention and spark interest.
Home Office Presentation
As remote work becomes more common, a well-presented home office is a big selling point. When photographing these spaces:
- Keep the desk clean and organized with minimal accessories.
- Showcase built-in shelves and storage options.
- Tuck away any visible cables for a tidy look.
- Take wide shots to show the entire room and close-ups to highlight custom details.
Specialty Rooms and Features
Each specialty room requires a unique approach to emphasize its standout elements:
| Room Type | Key Elements to Capture | Photography Tips |
|---|---|---|
| Wine Cellar | Racks, temperature controls, tasting area | Use warm lighting to enhance wood tones. |
| Home Gym | Equipment layout, mirrors, flooring | Wide-angle shots help show the full layout. |
| Custom Built-ins | Craftsmanship, storage, unique designs | Close-ups highlight intricate details. |
Tailoring your photography to these rooms ensures that their distinct characteristics shine.
Lighting Techniques for Special Features
Using HDR photography can be a game-changer, especially for spaces with large windows or stunning views. This method balances interior and exterior details:
- Combine multiple exposures to retain clarity in both bright and shadowed areas.
- Use lighting to draw attention to architectural highlights.
- Try virtual dusk photos for exteriors – they can boost click-through rates by up to 300%.
Composition Strategies
Make special features stand out with thoughtful framing:
- Use natural elements like doorways or archways to frame the subject.
- Apply the rule of thirds for balanced and eye-catching shots.
- Include context shots to show how the feature fits into the surrounding space.
- Capture close-ups of unique craftsmanship or materials.
Professional Staging Tips
Proper staging can help buyers imagine a space’s potential:
- Arrange multi-purpose rooms in different setups to highlight versatility.
- Use subtle props to suggest possible uses without overwhelming the space.
- Choose staging elements that enhance the room’s features.
- Create small lifestyle scenes to help buyers picture themselves living there.
These techniques, combined with your other interior shots, can create a cohesive and engaging property presentation.
10. Location and Surroundings
Once you’ve captured the interior and exterior of the home, it’s time to showcase the property’s surroundings and neighborhood features.
Photographing Window Views
Use HDR techniques to capture clear and balanced views through windows. Here are some examples:
| View Type | Photography Technique | Best Time to Shoot |
|---|---|---|
| City Skyline | HDR with multiple exposures | Dawn or dusk |
| Natural Landscapes | Wide-angle lens with HDR | Golden hour |
| Water Views | Polarizing filter with HDR | Mid-morning |
Highlighting these views can add depth to your listing and emphasize the property’s connection to its environment.
Neighborhood Amenities
Photograph nearby attractions that enhance the property’s appeal. Focus on capturing:
| Amenity Type | Key Elements to Capture | Distance Information |
|---|---|---|
| Parks & Recreation | Trails, playgrounds, sports areas | Include distance in miles |
| Shopping & Dining | Main street, popular restaurants | Provide walking times |
| Transportation | Transit stations, highway access | Note commute times |
Including these details helps potential buyers visualize the lifestyle the location offers.
Tips for Professional Window Photography
When photographing window views, keep these tips in mind:
- Use exposure bracketing and ensure windows are spotless to avoid distracting reflections.
- Shoot during optimal natural light conditions for a well-balanced result.
These adjustments can make a significant difference in presenting the property’s views.
Virtual Dusk Photography
Virtual dusk photography can make exterior shots stand out. Studies show these twilight-enhanced images can increase click-through rates by up to 300%. This technique works especially well for properties featuring:
- Outdoor lighting
- Unique landscaping
- Architectural highlights
- Pools or water features
Showcasing Community Features
Help buyers feel connected to the area by capturing:
- Farmers markets
- Community gathering spots
- Nearby schools
- Popular walking trails
These images offer a glimpse into the lifestyle potential buyers can expect.
Seasonal Photography Tips
Tailor your shots to the season to highlight the property’s charm year-round:
| Season | Focus Areas | Shooting Tips |
|---|---|---|
| Spring | Blooming gardens, parks | Use morning light |
| Summer | Pools, outdoor spaces | Shoot during golden hour |
| Fall | Foliage, tree-lined streets | Capture midday |
| Winter | Snowy landscapes | Opt for overcast skies |
Adjusting your approach based on the season ensures the property looks its best no matter the time of year.
Conclusion
Professional real estate photography plays a key role in standing out in today’s competitive market. The 10 must-have shots discussed in this guide are the backbone of property listings that grab attention and encourage potential buyers to take action.
The impact of professional HDR photos on listing performance speaks for itself:
| Photo Type | Effect on Listing Performance |
|---|---|
| HDR Property Photos | 300% increase in click-through rates |
| Virtual Dusk Photos | 300% boost in online engagement |
| Walkthrough Videos | 4x more listing inquiries |
"My clients love the quality that they deliver. And as a real estate agent, that’s what separates a good agent from an average agent."
High-quality photography ensures a polished and professional look across all listing materials. Real estate professional Liz Zeng emphasized this point by saying:
"The photos turned out absolutely fantastic – crisp, professional, and beautifully lit. The quality exceeded expectations, and the attention to detail was evident in every shot."
To summarize, here’s what to focus on:
- Use HDR photography to showcase vibrant, true-to-life colors.
- Add virtual dusk photos to increase online engagement.
- Maintain consistent quality across all listing visuals.
- Collaborate with photographers who understand the nuances of real estate marketing.